Thou shalt not covet. When it comes to board game tables, I am almost willing to break a commandment. Very fancy board game tables have popped up at conventions, Kickstarter, and Etsy. I want it.

In most cases, a game table is just a dedicated surface for playing all manner of tabletop games. They usually include a spongy surface for being able to pick up cards and tokens easily, a wide frame to place your cards or area to write, and cup holders.
I decided to make my own gaming table.
The decision to make my own versus buying was helped by the fact that I had an attic filled with two-by-four pieces of wood and a giant 6’x3′ sheet of subflooring. The previous homeowner was in the middle of some unfinished woodworking projects. Since the sub-flooring sheet was 6’x3′, I made the dimensions of the game table the same. This also means that many gaming mats will fit perfectly. Gaming mats are like giant mouse pads with a print and made of a spongy backing.
Design
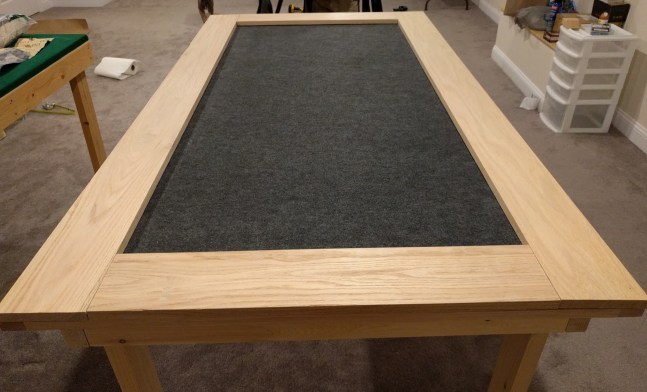
My design was simple. Build a 6’x’3 frame out of the two-by-fours. Add table legs. Put 6’x3′ subflooring panel on top. And, finally frame the whole thing to give the table a small ledge. I used 6″ oak panels from Lowes to build the ledge. The ledge is a separate piece so I can swap out the gaming mat if needed or clean up spills without ruining the whole thing.
Tools and Things
I didn’t have any woodworking tools. So, I assembled a short list of tools and things needed to build this table…
- Snacks
- Beverages
- Friend with tools
- Miter saw
- Power drill and screwdriver
- Power sander
- Screws
- Corner brackets
- Sandpaper
- Pre-stain
- Stain
- Polycrylic sealer
To keep the costs down, I bribed a friend to help me. They get a lifetime pass for gaming action on a cool DIY game table… and, snacks and beverages. The main tool needed was a miter saw. This was used to make nice straight cuts. Other tools needed: a power drill to drill holes for screws and a screwdriver to screw the screws into the holes.
Table Frame
I was only trying to make sure that the outside dimensions were 6’x3′. I made up the configuration on the spot.

Table Ledge
The ledge acts as a frame around the sub-flooring panel. This gives you a nice place to hold cards or write notes. I used corner brackets to square up the ledge and used the sub-flooring panel as my guide.


Table Assembly
The table is three separate parts: frame, subflooring surface, and ledge. Obligatory selfie. First Game = Arkham Horror: The Card Game.


Finishing
For a while, I tried to talk myself out of sanding and staining the wood. The wood had sharp edges and rough spots. It took some convincing, but I decided to finish this off and it made a huge difference. The finishing process took way longer than the assembly.
My Process
- Sanding – so much sanding – this creates a lot of dust – wear a mask – be prepared to clean up dust for months – use 80 grit first, 120 second, and 220 third – be patient
- Pre-staining – apply pre-stain to the wood and let dry – this really helps with staining or so YouTube says
- Staining – apply stain within 2 hours of the pre-stain and repeat
- Sealing – use a water-based polyacrylic sealer to seal the ledge – this will help with spills and cup rings and protect the wood or so YouTube says – let dry for 30 minutes – lightly sand with 220 grit and repeat two more times – it’s worth doing this as many times as you can fit into a weekend


Going Next Level
Deep-Cut Studio creates custom gaming mats for any size surface. I uploaded a custom piece of art to enhance my Arkham Horror: The Card Game campaign. Deep-Cut is based in England and it took less than two weeks to get my custom gaming mat. More on that at a later date.


One comment